
How to Make Animation with AI: Step-by-Step Guide for Beginners (2026)
A year ago, making animation meant one of two things: spending months learning software like Blender or Toon Boom, or paying a studio thousands of dollars to do it for you.
That’s no longer true.
AI animation tools in 2026 have closed the gap between “I have an idea” and “I have a finished animated video” to a matter of hours. You don’t need drawing skills. You don’t need to understand frame rates or rigging or rendering pipelines. You describe what you want, and the AI builds it.
This guide is a complete, practical walkthrough of how to make animation with AI - from understanding how the technology works, to choosing the right tool for your use case, to producing your first finished animated clip step by step.
How AI Animation Actually Works
Before jumping into tools and steps, it helps to understand what’s happening under the hood - because it directly affects how you prompt and what results you get.
Traditional animation requires a human to draw or position every frame. A 60-second clip at 24fps means 1,440 individual frames. AI animation eliminates that manual work through three core techniques:
Diffusion-based video generation is the most common approach in 2026. The AI starts with random noise and progressively “denoises” it into coherent video frames that match your text description. Critically, it generates frames as a sequence - so it understands that if a character is on the left in frame 1, they should be slightly different in frame 2, maintaining continuity. This is how tools like Kling, Luma, and Google Veo 3 work.
Image-to-video animation takes a single still image (a character design, a scene concept, a photo) and generates motion from it. You define the starting frame; the AI figures out how it should move. This produces more consistent results than pure text-to-video because the visual identity is anchored from the start.
Character consistency engines are a newer layer built on top of the above. Standard AI video generators regenerate your character from scratch each clip - which causes the same character to look subtly different from shot to shot. Dedicated animation platforms like Anijam solve this by locking your character’s visual identity and referencing it across every scene generated. This is what separates a series of disconnected AI clips from an actual animation with a consistent protagonist.
Understanding these three layers answers the most common question beginners ask: “Why does my character look different every time?” - and points directly to the solution.
What Type of Animation Do You Want to Make?
AI animation tools aren’t all built for the same output. Before choosing a tool, clarify what you’re actually trying to create:
| Goal | Best AI Approach |
|---|---|
| All kinds of Animation Story | Character consistency engine + cinematic scene generation (Anijam) |
| Social media clips (TikTok, Reels) | Fast text-to-video generators (Kling, Pika) |
| Starting from a script | Script-to-animation workflow (Anijam) |
| Explainer / marketing video | Template-based platforms (Animaker, Renderforest, InVideo) |
| Realistic cinematic video | Premium generators (Runway Gen-4, Google Veo 3) |
| Remixing existing animation templates | Inspiration gallery (Anijam) |
| Cartoon / 2D character animation | Puppet-based tools (Adobe Character Animator) or Anijam |
| Photo-to-animation (animating a still) | Image-to-video tools (Luma, Midjourney Video) |
If your goal involves a recurring character across multiple scenes - a protagonist in a story, a brand mascot, an anime series — you need a platform with character consistency. That’s the non-negotiable requirement that most beginner guides skip over, and it’s why most first attempts at AI animation produce a string of beautiful but disconnected clips rather than a coherent animated piece.
AI Animation Tools in 2026: What Each Does Well
Here’s an honest breakdown of the major tools currently available, and where each one fits:
Anijam - Full Animation Pipeline with Character Consistency
Anijam is built specifically for animated storytelling. Unlike video generators that produce individual clips, Anijam functions as an AI animation agent that manages the complete production pipeline from a single canvas: character design, character consistency across scenes, motion control, lip sync, timeline editing, and export.
Key features:
- Character consistency engine - locks your character’s appearance and maintains it across every scene
- Inspiration gallery - browse and remix ready-made animation templates by genre and style
- Script-to-animation - paste a full script, get a structured scene breakdown
- Text to Animation - describe a scene in plain language, get animated video
- Image-to-animation - bring any character design or image to life
- AI lip sync - automatic mouth sync to any audio or voiceover in 30+ languages
- Style library - classic anime, Ghibli, cyberpunk, 3D cinematic, Minecraft, and more
- AI voice generator - generate voiceovers directly in the platform
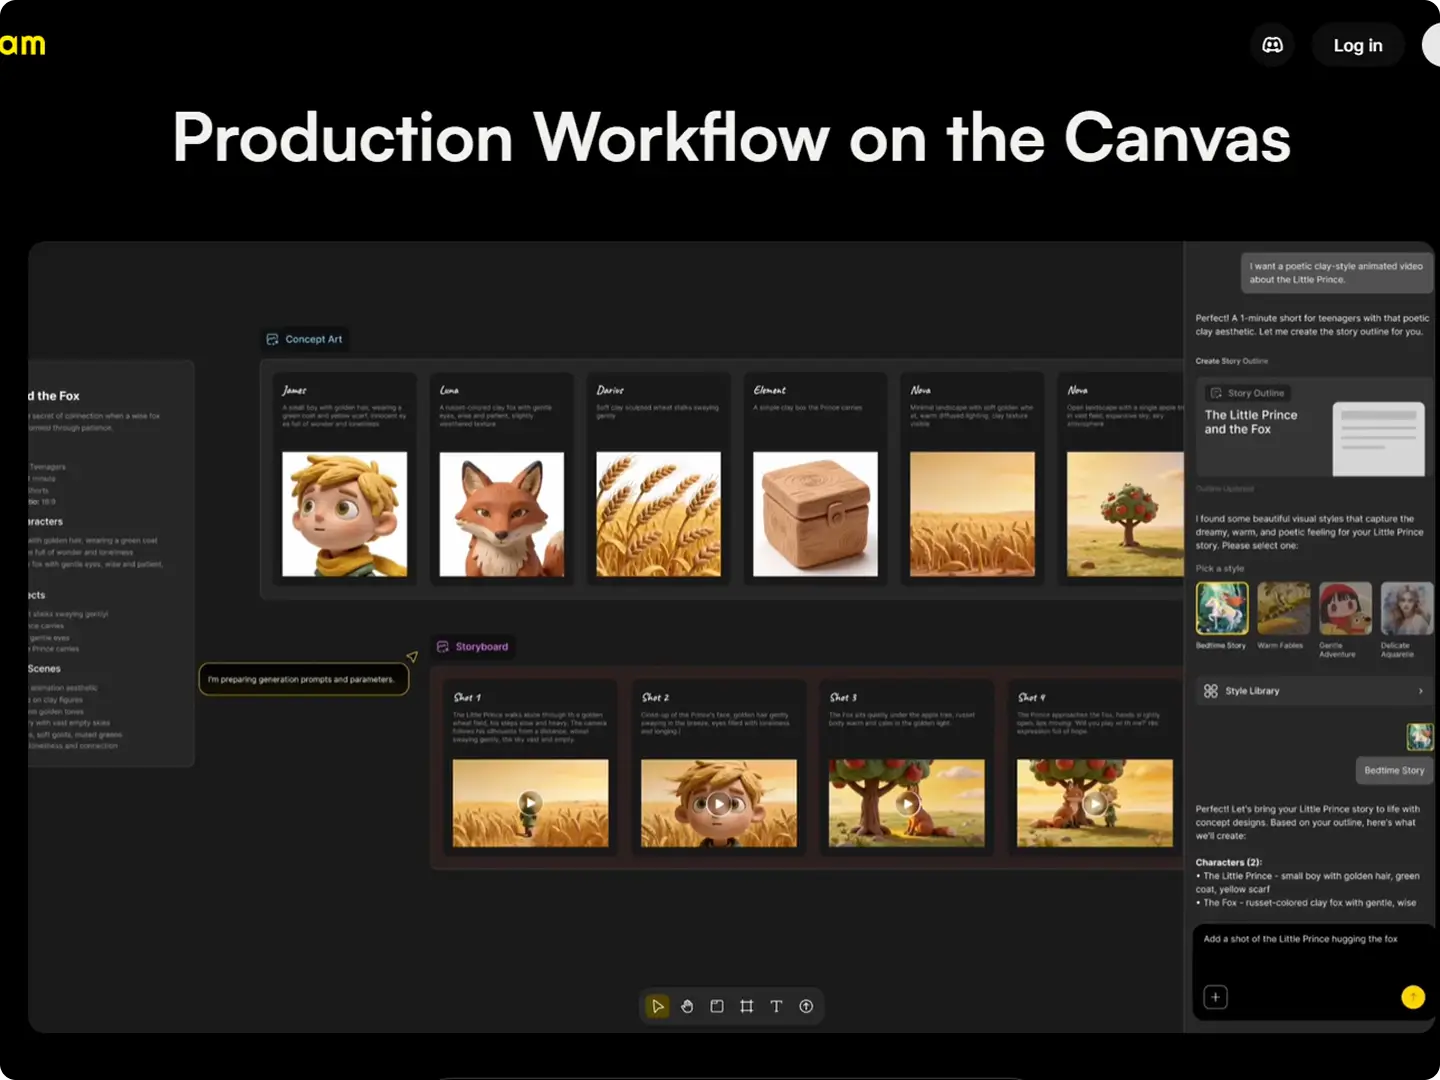
What makes it different: The character consistency engine locks your character’s appearance and maintains it across every scene - solving the core problem that makes most AI animation projects fall apart. You describe your scenes in natural language; Anijam handles the execution across a full timeline.
Best for: Anime-style animation, short films, long animation series, original character stories, brand mascot animation, any project where a character needs to appear consistently across multiple scenes.
Free tier: Yes - create and test your first projects at no cost.
Runway Gen-4 - Cinematic Quality, Scene-by-Scene
Runway produces some of the highest-quality video generation available, with strong motion coherence and cinematic output. The trade-off is price - it’s the most expensive option per second of generated video - and it doesn’t have native character consistency across separate clips.
Best for: High-quality individual scenes, cinematic short clips, creators with budgets who prioritize visual quality above character story continuity.
Kling 3.0 - High Volume at Lower Cost
Built by Kuaishou, Kling is roughly 80% of Runway’s quality at about 40% less cost per second. Its “Spatial-Temporal Attention” system produces physically accurate motion - objects fall correctly, liquids behave like liquids - making it particularly strong for product demonstrations and explainer-style clips.
Best for: Social media content at volume, product demos, creators who need fast iteration at lower per-clip cost.
Pika 2.5 - Speed-Optimized for Social Content
Pika trades some cinematic quality for fast output and an intuitive interface. Strong for short social clips where turnaround speed matters more than production value.
Best for: TikTok, Instagram Reels, YouTube Shorts, quick content that needs to move fast.
Animaker / InVideo / Renderforest - Template-Based Explainer Video
These platforms offer pre-built character libraries, drag-and-drop interfaces, and automated script-to-video workflows. They produce explainer and marketing videos quickly but have limited stylistic range - output looks like explainer video templates, not original animation.
Best for: Marketing teams, corporate explainers, educational content, anyone who needs functional animated video fast without a specific visual identity requirement.
The Key Distinction
There’s a meaningful difference between clip generators (Runway, Kling, Pika) and animation production platforms (Anijam). Clip generators excel at producing individual high-quality moments. Animation platforms manage the relationship between clips - character consistency, timeline structure, scene continuity - turning individual generations into a coherent piece.
Start Faster: Using Anijam’s Inspiration Gallery
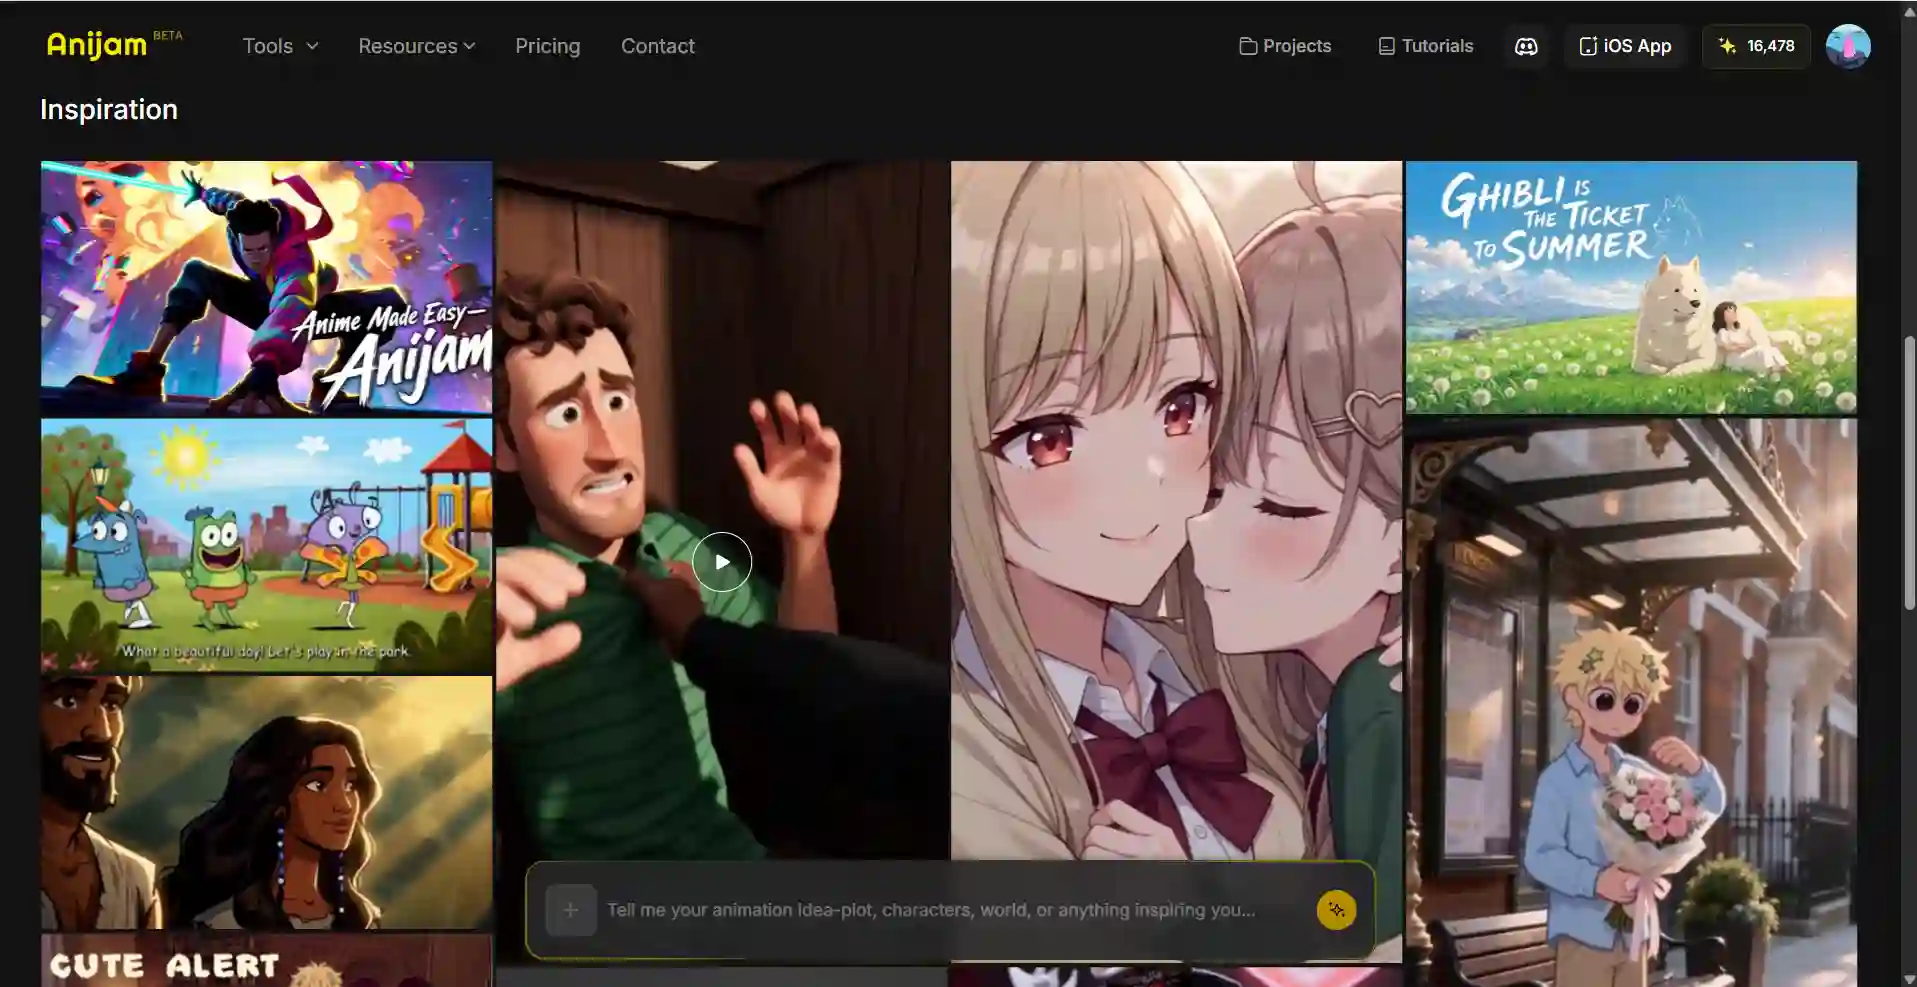
One of the most practical recent additions to Anijam is the Inspiration gallery, accessible from the homepage. Instead of starting from a blank canvas and figuring everything out from scratch, the Inspiration section shows a curated collection of animated examples across different genres, styles, and moods - action, romance, fantasy, Ghibli, cyberpunk, slice-of-life, and more. Each example is a fully playable animation you can preview directly.
How it works:
- Browse by mood or style. Scroll the Inspiration gallery to find an animation with the visual tone, genre, or character type that matches your project.
- Use as a template reference. When you find a direction you like, you can use it as a creative starting point - borrowing the style parameters, scene structure, or character aesthetic to inform your own project.
- Eliminate blank-canvas paralysis. The most common blocker for new creators isn’t technical - it’s not knowing where to start. Inspiration solves this by giving you concrete examples of what’s possible to model from.
- Iterate from something real. Rather than building prompts from pure imagination, you can describe what you see in an Inspiration clip and use that as the foundation for your own scenes.
Best use of the Inspiration gallery:
- Use it before writing your scene outline - find 1-2 reference animations in the style you want to make
- Note what visual elements you want to replicate: the color palette, camera work, animation style, character design aesthetic
- Use those observations to write better, more specific style descriptions and scene prompts
This feature significantly closes the gap between “I have no idea where to start” and “I have a concrete direction” - which is why it’s worth starting there before any other step.
How to Make Animation with AI: Complete Step-by-Step (Using Anijam)
Anijam works differently from traditional animation tools - and differently from most AI video generators. The key distinction: you don’t build the story structure yourself. You give Anijam your idea, and the AI agent generates the full story outline, scene breakdown, and character suggestions automatically. Your job is to direct and refine, not to plan every frame from scratch.
Here’s the actual workflow, from first idea to finished export.
Step 1: Input Your Idea (or Browse Inspiration First)
Option A - Start from the Inspiration gallery. If you don’t have a clear idea yet, open the Inspiration gallery on Anijam’s homepage. Browse animations across genres - action, romance, fantasy, Ghibli, cyberpunk, slice-of-life - and find one in the visual territory you want to explore. Use it as a creative reference before moving to the canvas.
Option B - Type your idea directly. Open Anijam and enter your concept into the canvas. This can be:
- A single sentence: “A young anime warrior discovers a glowing sword in a ruined temple, which awakens her powers.”
- A paragraph: describe the story, the characters, the mood, the style
- A full script: paste multi-scene dialogue and scene descriptions
- A reference image: upload a visual reference to guide the style or character direction
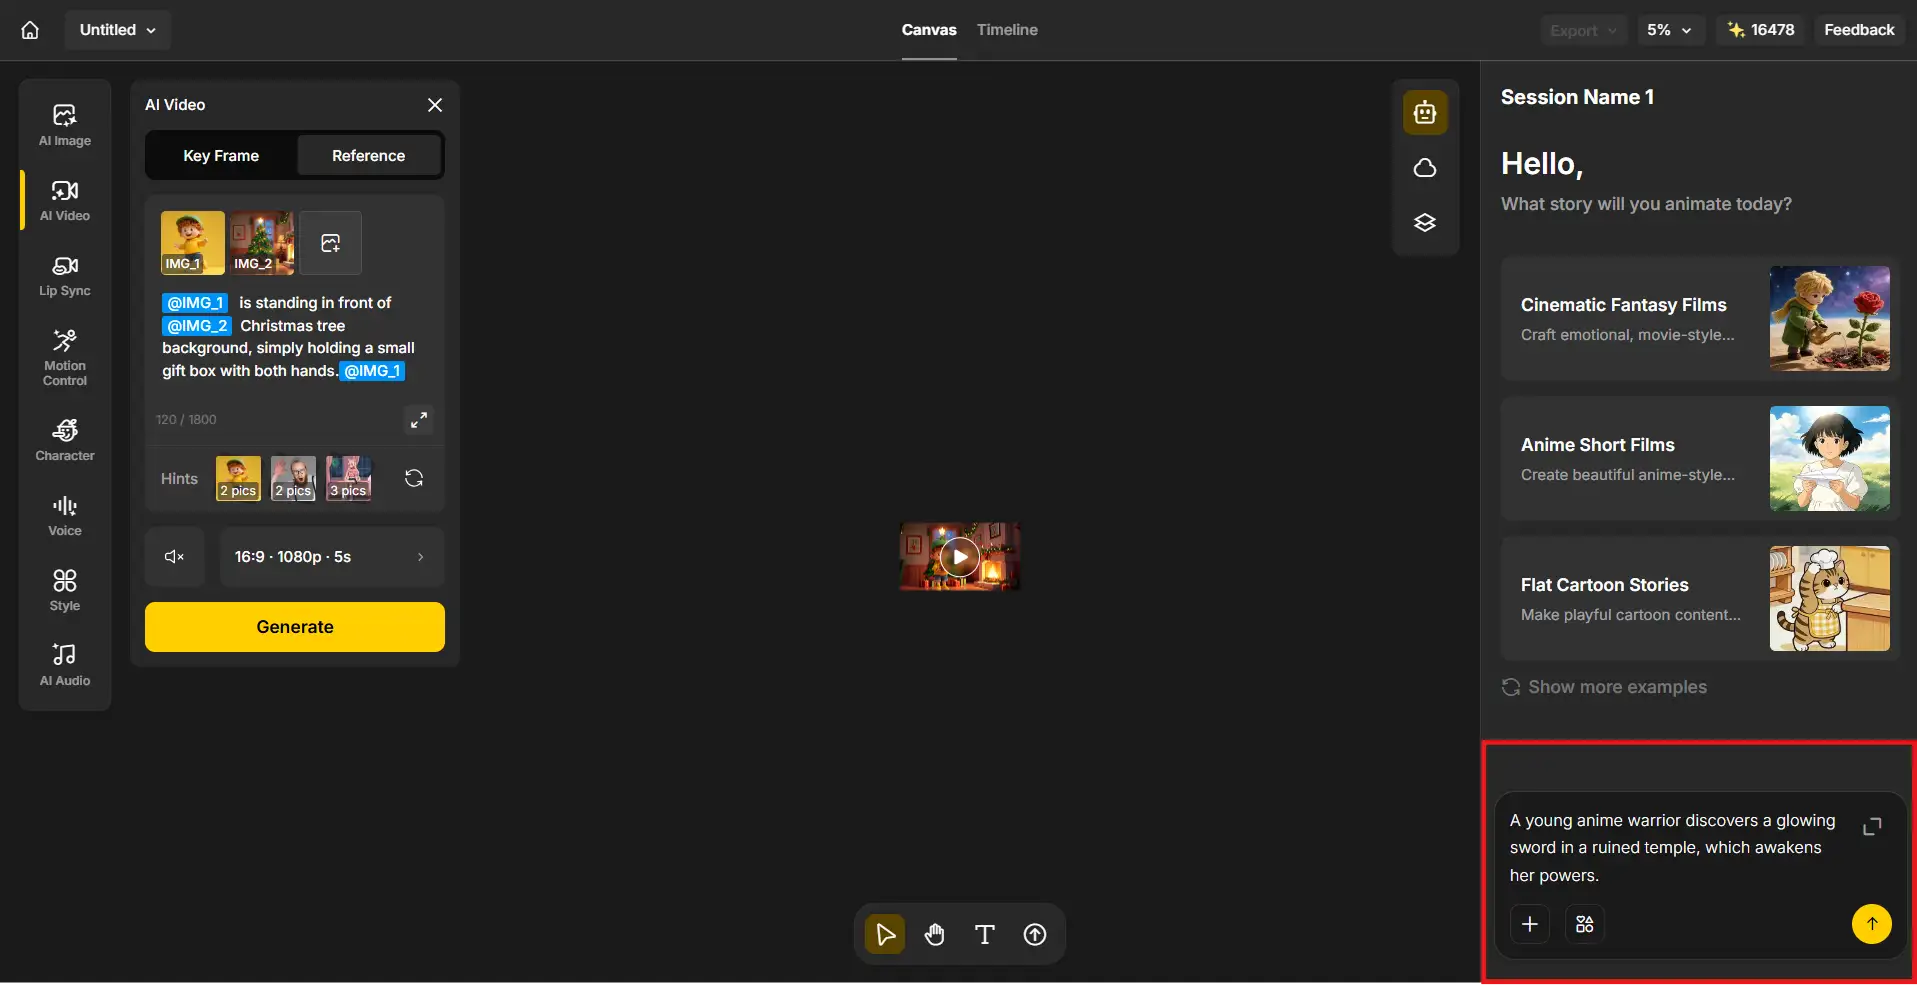
Once you input your idea, Anijam’s AI agent reads it and automatically generates a full story outline - complete with scene breakdown, character suggestions, and shot structure. You don’t write the scene-by-scene outline manually. The AI produces it in seconds.
This is the core difference from other AI tools. You’re not building a shot list yourself and prompting each scene from scratch. Anijam acts as a director: it reads your concept and proposes a complete animated story structure. You then adjust, approve, or redirect.
Step 2: Design Your Characters and Choose Your Style
Character design. Define your character(s) once. Describe their appearance in text - or upload a reference image - and Anijam generates a fully realized character design. The platform then locks that character’s appearance, style, and proportions across every scene automatically. No character drift. No redesigning between scenes.
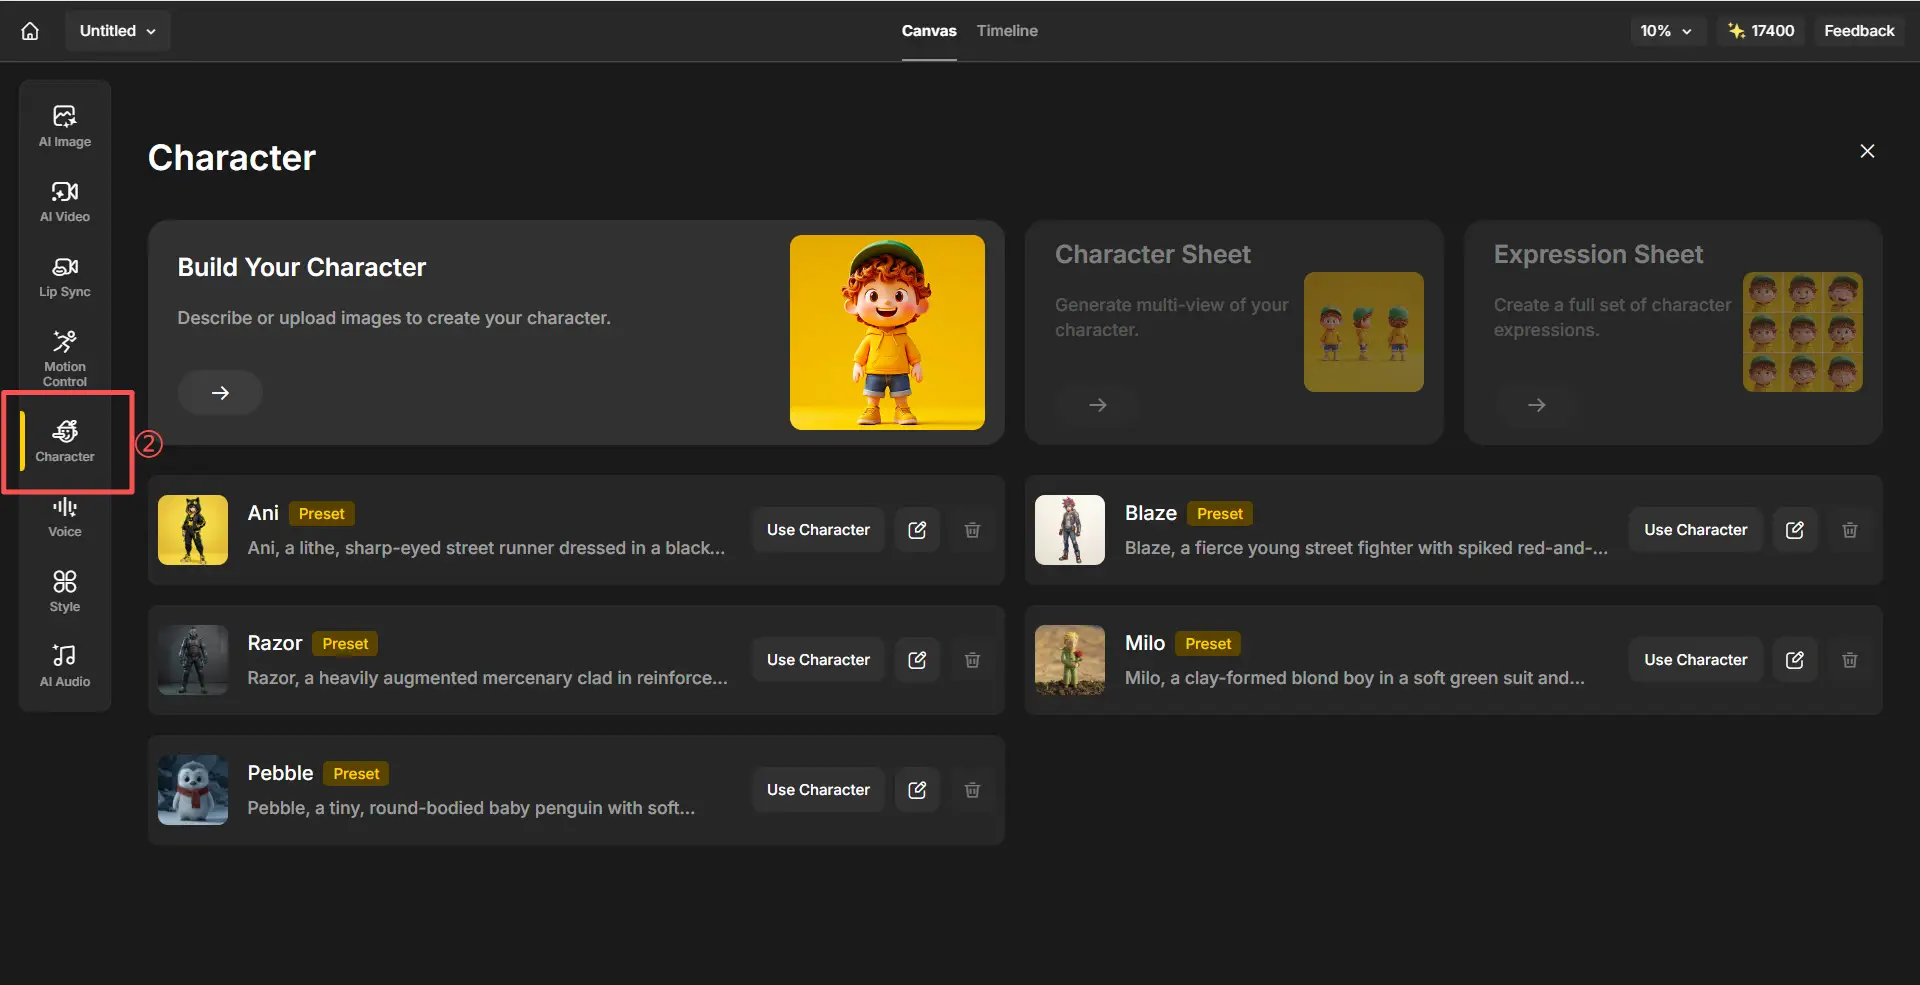
Include in your character description:
- Physical features (hair, eyes, build, distinguishing details)
- Outfit and any accessories
- Default expression / personality feel
- Rendering style (cel shading, painterly, 3D cinematic)
Example: “Young female warrior, early 20s. Silver hair in a loose bun. Amber eyes, focused expression. Worn leather armor with white tunic. Lean, athletic. Cinematic anime style, clean cel shading.”
Anijam can also expand a half-body character design into a full-body version using text prompts - useful if your reference image only shows from the waist up.
Visual style selection. Choose from Anijam’s style library:
- Classic 2D anime (cel shading, defined outlines)
- Cinematic anime (Demon Slayer / Ufotable quality range)
- Ghibli-inspired (soft painted backgrounds, warm light)
- 3D Cinematic (film-quality render)
- Cartoon (classic 2D flat)
- Cyberpunk, dark fantasy, pixel art, and more
- Custom style training - train your own style to match a specific visual identity or brand
Audio setup. At this stage, set up your audio:
- Choose from 200+ AI voices in Anijam’s multilingual voice library (30+ languages), or
- Upload your own recorded audio or voiceover
For animations without dialogue, you can skip audio for now and add music later in the timeline.
Step 3: Generate Your Animation
Hit Generate. Anijam’s AI agent renders each scene in your story outline - with motion, character animation, cinematic camera work, and lighting - all applied automatically based on the emotional beats of your story.
What happens during generation:
- Each scene is rendered with your locked character appearing consistently
- Camera angles are applied intelligently - wide shots for establishing moments, close-ups for emotional beats, low angles for dramatic reveals
- If you added dialogue, lip sync is applied automatically - character mouth movements are mapped to phonemes with expressive, natural-looking results. No manual timing required.
- Motion control is applied: gestures, movement direction, scene dynamics all driven by your story description
You don’t need to prompt each scene individually. The AI handles the execution across the full story structure it generated in Step 1.
If you want to adjust individual scenes: Anijam lets you re-render specific scenes without regenerating the entire animation. Describe what you want changed - different camera angle, different character action, different lighting - and re-shoot just that scene.
Motion control tip: You can refine motion in plain language (“have the character look up slowly before turning”) or guide it with a reference video. The AI handles the technical execution.
Step 4: Edit on the Timeline
Timeline editing. All generated scenes drop automatically into Anijam’s built-in timeline editor. This is where you shape the final piece:
- Sequence - drag to reorder scenes if needed
- Trim - cut weak openings or awkward endings (AI clips often have their best moment in the middle)
- Pacing - adjust scene durations. Action scenes: 4-6s. Emotional moments: 6-10s. Vary lengths to avoid mechanical rhythm.
- Transitions - hard cuts work for most scene changes; slow dissolves for time jumps or major emotional shifts
Step 5: Export and Share
| Platform | Resolution | Format | Aspect Ratio |
|---|---|---|---|
| YouTube | 1080p or 4K | MP4, H.264 | 16:9 |
| TikTok / Instagram Reels | 1080p | MP4, H.264 | 9:16 |
| Twitter / X | 1080p | MP4 | 16:9 or 1:1 |
| Film festivals / professional | 4K high-bitrate MP4 | - | Varies |
Anijam exports at 1080p on standard plans, with 4K available on premium. Watermark-free on eligible plans. Commercial usage rights included on eligible tiers - check your plan before publishing commercially.
The Biggest Mistakes in AI Animation & How to Avoid Them
Skipping character design. If you try to describe your character fresh in each scene prompt, it will drift - different hair, different face, different outfit. Design your character once using Anijam’s consistency engine and reference it for every generation.
Making your first project too long. 30-60 seconds is a full project for a first attempt. The number of decisions, iterations, and edits compounds quickly. Finish something short and good rather than abandoning something ambitious.
Ignoring sound. Silence makes AI animation feel cheap and unfinished. Even a single music track transforms the experience. Sound is not optional.
Uniform pacing. Every scene the same length, every cut the same rhythm - it reads as mechanical. Vary your scene durations. Use silence and holds deliberately. Pacing is the emotional grammar of animation.
Expecting perfection on the first generation. AI animation is an iteration process. Your first generation is a draft. Generate, assess, adjust the prompt, regenerate. Two to three attempts per scene is normal - not a failure.
How Long Does It Take to Make an AI Animation?
Realistic time estimates for a 30-60 second animated short using Anijam:
| Phase | Time |
|---|---|
| Concept input + AI story outline review | 15-25 min |
| Character design and style setup | 20-40 min |
| Scene generation (5-7 scenes, 2-3 attempts each) | 1-2 hours |
| Lip sync and voice (if applicable) | 30-60 min |
| Timeline editing and pacing | 30-60 min |
| Sound design and music | 30-60 min |
| Export and review | 15 min |
| Total | 3.5-6.5 hours |
Compare this to traditional 2D animation, where a single animator might spend 40-80 hours on the same 60-second clip. The gap is real, and it’s why AI animation has fundamentally changed who can create animated content.
Frequently Asked Questions
Do I need drawing skills to make animation with AI? No. AI animation tools like Anijam use natural language descriptions to generate character designs and scenes. Drawing skills help you communicate visual ideas more precisely, but they’re not required to produce professional-looking animated output. Everything in this guide can be done by someone with zero artistic background.
What’s the best free AI animation tool? Anijam offers a free tier to create and test your first projects. For individual clip generation, Kling and Pika both offer free tiers with watermarked output. Animaker and Renderforest have free plans for explainer-style video. The right free tool depends on what you’re making - for story-driven animation with a consistent character, Anijam’s free tier is the strongest starting point.
How do I keep my character looking the same across scenes? This is the central challenge of AI animation. Standard text-to-video tools generate characters from scratch in every clip - causing subtle drift in appearance. Anijam’s character consistency engine solves this by locking your character’s visual identity at the design phase and referencing it automatically across every generation. Design your character once; the system maintains it.
Can I make anime-style animation with AI? Yes, and it’s one of AI animation’s strongest output styles. Anime cel shading, dynamic action scenes, expressive character emotion, and cinematically composed backgrounds are all achievable with the right prompts and tool. Anijam’s style library includes dedicated anime aesthetics - from classic 2D cel shading to cinematic Demon Slayer-quality rendering to Ghibli-inspired painted backgrounds. For a full library of anime-specific animation prompts, see our anime art style prompts guide.
What’s the difference between AI animation and regular AI video generation? AI video generators (Runway, Kling, Pika) produce individual clips. AI animation platforms (Anijam) manage the relationship between clips - character consistency across scenes, timeline editing, lip sync, and full production workflow - turning separate generations into a coherent animated piece. For a single viral clip, a video generator is fine. For any project with a story and a recurring character, you need an animation platform.
Do I own the animation I create with AI? This varies by platform and jurisdiction. Generally, the human authorship you contribute - story, direction, editing choices, creative decisions - supports copyright claims on the final work. Anijam includes commercial usage rights on eligible plans. Check your specific plan terms before publishing commercially or submitting to festivals.
Final Thoughts
Making animation with AI in 2026 is genuinely accessible in a way it wasn’t even two years ago. The technical barriers - drawing skills, software mastery, rendering knowledge - have been replaced by a creative skill that most people already have: the ability to describe what you see in your head.
What AI can’t replace is the creative direction. The story, the character, the emotional arc, the pacing decisions - those still require a human who cares about the outcome. The tools handle the execution; you supply the intention.
The workflow in this guide - concept, character, scenes, sound, edit, export - is the same one professionals use. The difference is that AI has compressed each step from days into hours.
Start with 30 seconds. Build one character. Tell one complete story using Anijam.
by Wendy
Wendy is a passionate writer and AI animation enthusiast at Anijam, exploring creative ways to bring stories to life with AI-powered animation tools. She shares practical tips, prompt ideas, and insights to help creators turn their imagination into stunning animated content.